Tag Archives: appetizers

Gina’s Stuffed Mushrooms

One New Year’s Eve, I stayed home with my family and cooked like a mad woman. My stuffed mushrooms were a huge hit, and for this reason, I am happy to share my recipe with all of you.

Gina’s Stuffed Mushrooms:

Ingredients:

6 medium-sized Portobello mushrooms, with stems, chopped up
salt to taste for the mushrooms + 1/2 teaspoon for stuffing, optional
2 tablespoons extra-virgin olive oil
1/3 cup seasoned breadcrumbs
1/4 cup Pecorino Romano cheese, grated
/4 cup flat-leaf parsley, chopped + more for garnish
Pine nuts to taste
Olive oil cooking spray

Preparation:

Preheat oven to 375°F.

1. Season the mushrooms with salt. Combine the stems, salt, oil, breadcrumbs, Pecorino cheese, and parsley. Stuff the mushrooms. Top them with pine nuts.
2. Spray a flat tray with cooking spray and place the mushrooms.
3. Bake for 40 minutes uncovered.
4. Garnish with parsley.

Gina’s notes: wipe the mushrooms with a damp paper towel to clean them. This will avoid the mushrooms from retaining too much water. You can add thyme, marjoram or any kind of herb of your choice.
Wine pairing suggestions: Pinot Noir, Gavi, Sancerre, Chablis, Champagne or sparkling wines.

Stuffed Mushrooms before baking
Stuffed Mushrooms
Stuffed Mushrooms

Kindly let know if you will try this recipe. If you have any questions, please let me know via email.

I hope 2024 is off to a fabulous start!

Bon Appetit!

Gina Martino Zarcadoolas
Food & Wine Blogger, Sommelier Level 2
WSET Level 2 certified.
Cookbook Author: Cuisines, Corkscrews & Cultures
Italian Wine Scholar
Website: www.foodiewinelover.com
Email: gina@foodiewinelover.com

Olive Tapenade, Gina’s Style


Tapenade is a Provençal dip/spread that consists of olives, capers and sometimes anchovies. I love anchovies but I am not using it in this recipe.  You certainly can add them for more richness if you like them.  Beware of the high level of sodium in all the ingredients.  This mouthwatering spread is also found in Italian cuisine.

“Olive-based tapenades with anchovies and/or vinegar are ubiquitous in Italian cuisine and are documented in ancient Roman cookbooks dating back thousands of years before the appearance of the Occitan word tapenade

Follow me in my kitchen and let ‘s have fun with this delicious spread.

Serves 6-8 as an appetizer – Level of difficulty: Easy

Ingredients:

  • 1 cup Kalamata olives, pitted and rinsed
  • 1 cup green olives, pitted (Sicilians are the best) *
  • 1 Tbsp. chopped flat-leave Italian parsley + more for garnish
  • 4 Tbsp. extra-virgin olive oil + more to drizzle
  • Half of a lemon, juiced
  • 1 tbsp. capers, rinsed
  • 2 garlic cloves, rough chopped
  • Roasted red bell peppers for garnish, fresh or jar ones
  • 1 loaf of crusty bread, sliced or crackers*Preparation:
    1) Place Kalamata and green olives, parsley, oil, lemon, capers and garlic in a food processor. Pulse 25 times by stopping each time until you obtain a chunky but moist consistency, showing small bits of olives and other ingredients.
    2) Place in a serving bowl and chill. (Optional)
    3) Spread on delicious crusty bread or crackers. Drizzle with olive oil.
    Garnish with parsley and roasted peppers. This spread makes a dazzling appetizer and can be made ahead of time. Cook’s notes: I used Spanish olives, and they worked nicely.
    I don’t recommend that you add any salt to this spread, even if you’re not on a sodium-restricted diet. You can toast the bread to add that extra touch.  The choice is yours. Wine Pairing Suggestions: A lovely chilled white, such as Sauvignon Blanc, or any white or red varieties of your choice. Make sure, the acidity level is low to medium. This way, it will not take away the sharpness nor compete with the saltiness of the dish.  It’s ok, if you don’t consume alcohol, either way, you will enjoy this luscious appetizer. I hope you will try this recipe and share your thoughts with me.

    Happy Cooking from My Kitchen to Yours,

    Gina Martino Zarcadoolas aka Foodiewinelover
    My Food, Wine & Travel Lifestyles
    WSET-Level 2 Certified Wine Connoisseur
    Cookbook Author: Cuisines, Corkscrews & Cultures


Guacamole for Super Bowl 51

preppingguacamole
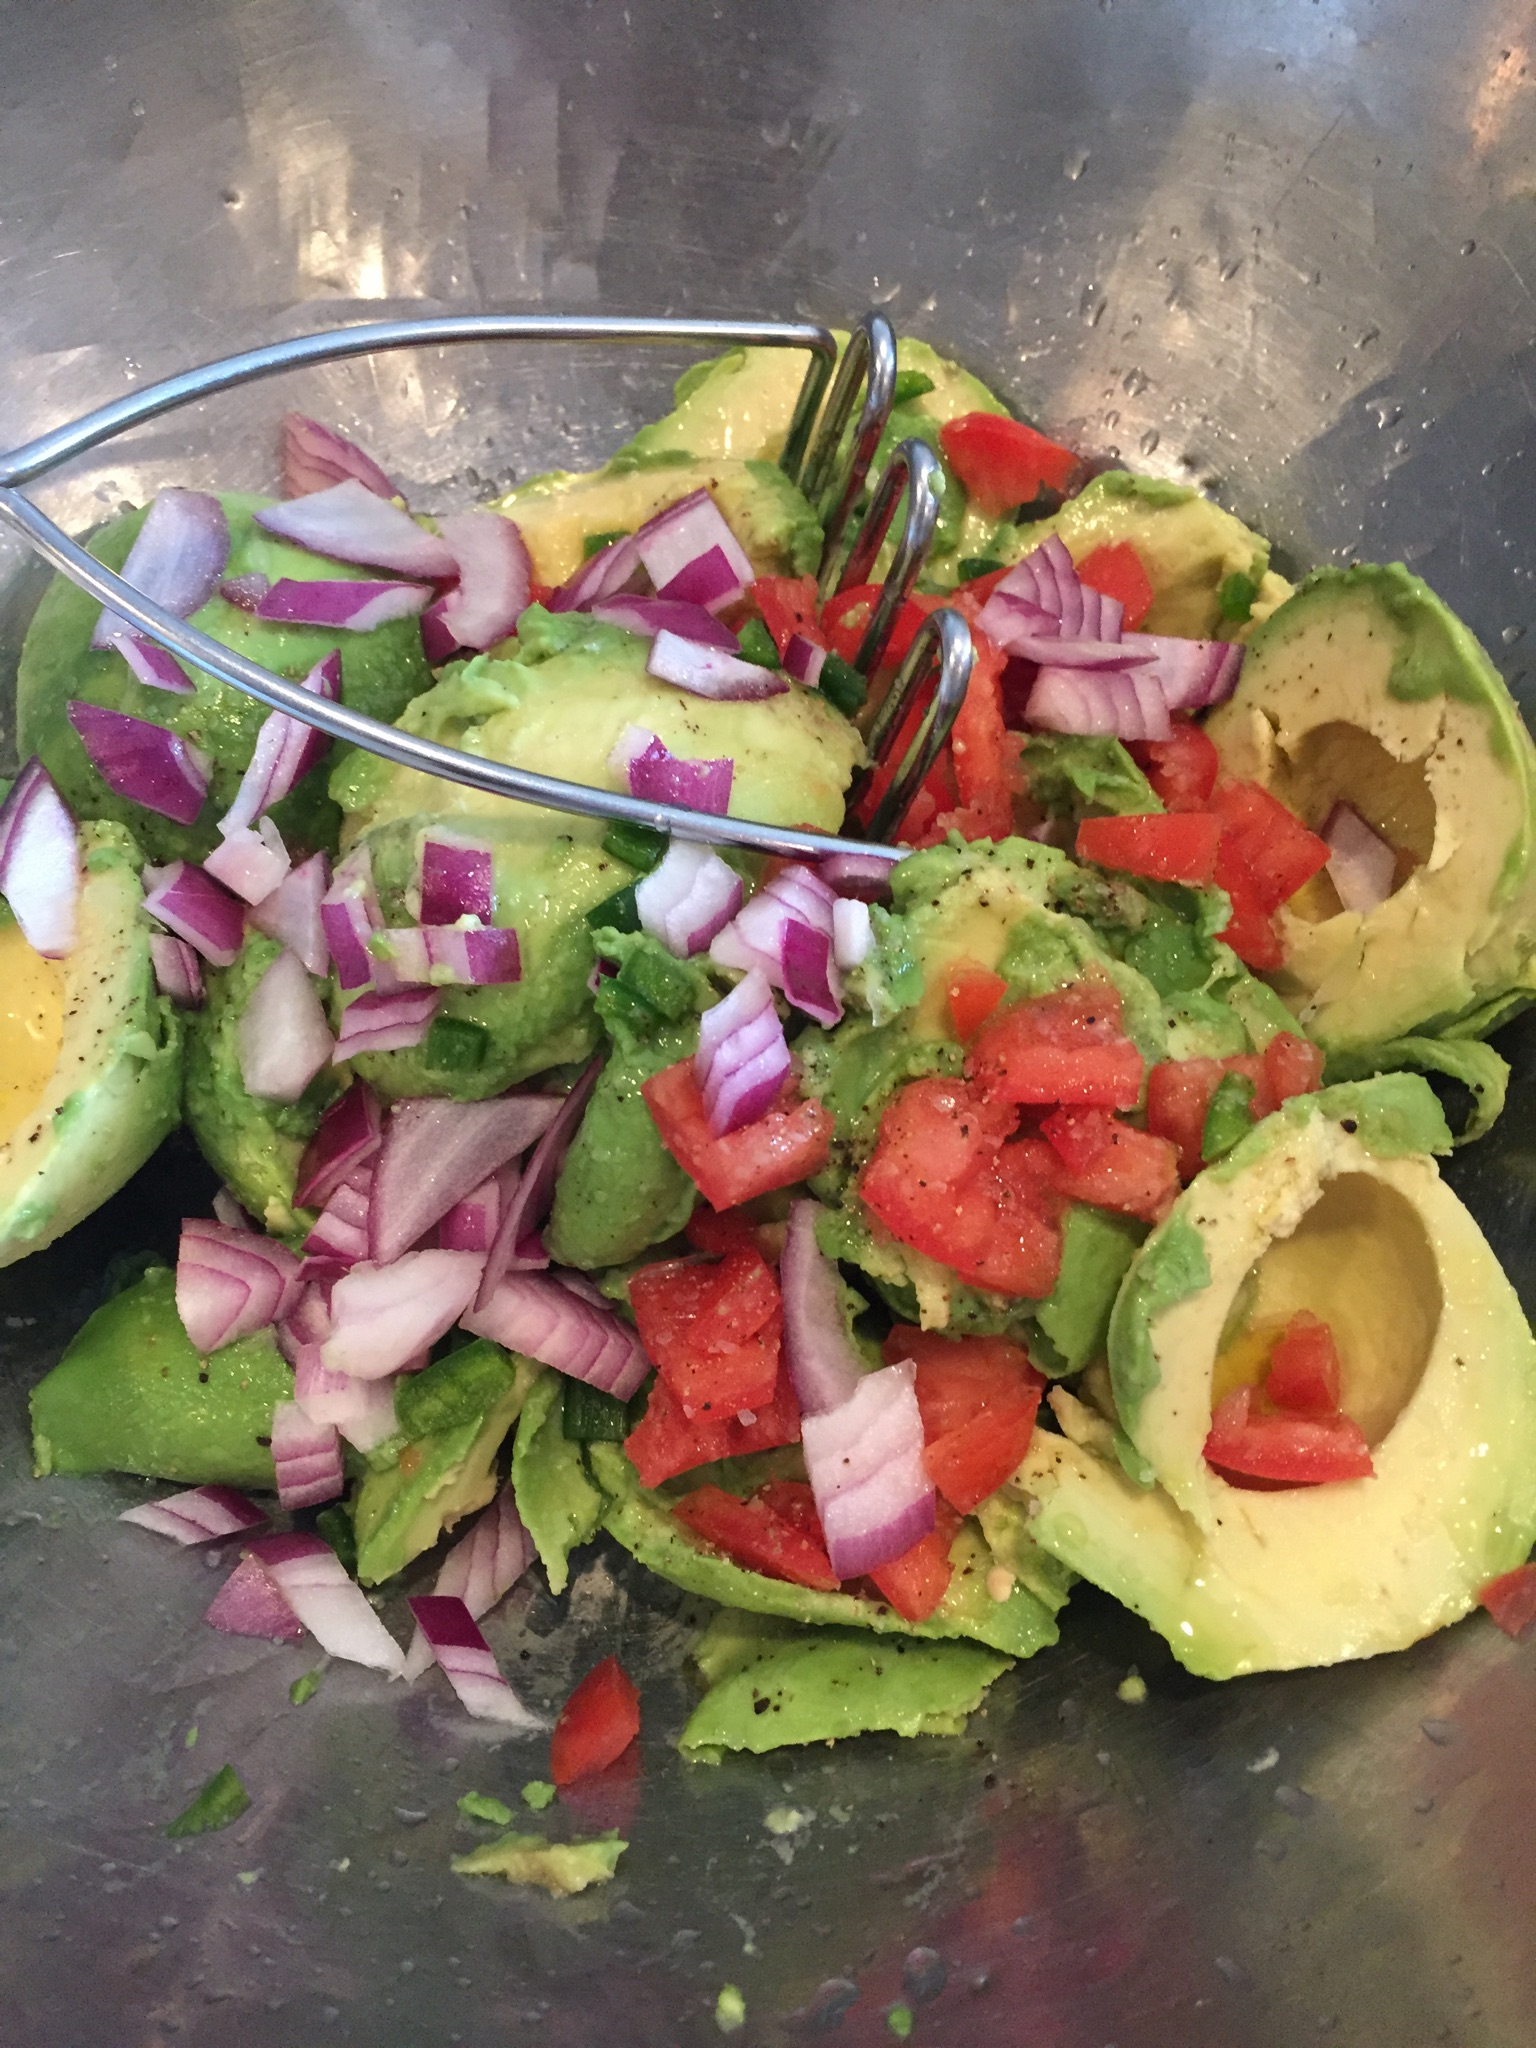
I wasn’t planning on making anything today, but I decided at the last-minute to share with you my simple and very delicious guacamole. It’s just in time for the Super Bowl, and it takes less than 15 minutes to prepare. Guacamole is a very popular dip made with avocados, and is a major crowd pleaser, especially on Game Day!
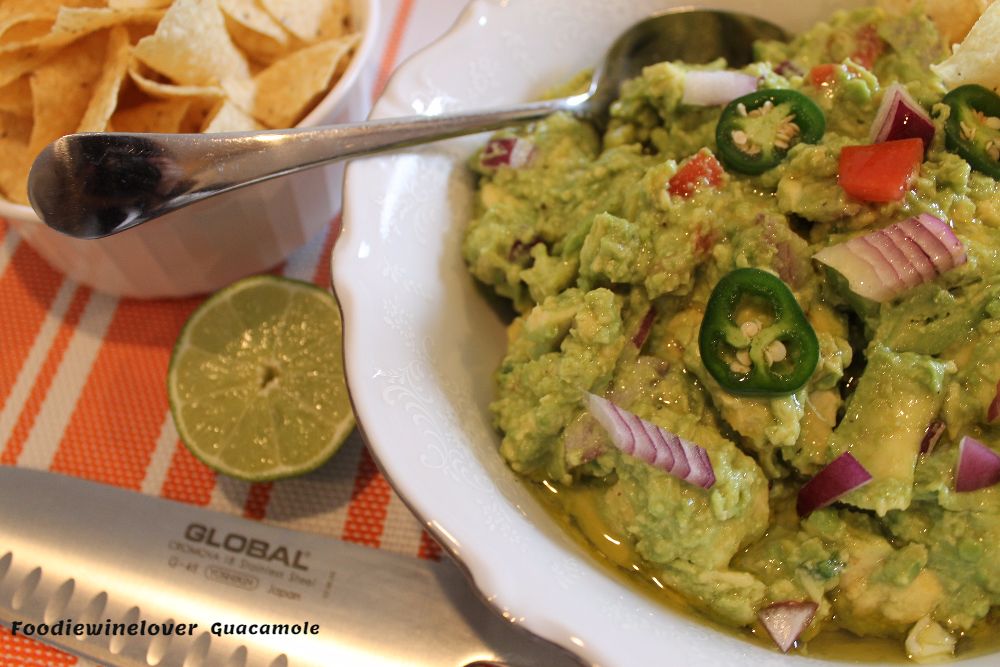
Servings: 6-10 as a dip with tortilla chips – served with other food
Level of difficulty: Super easy

Ingredients: 

  • 6 Hass avocados, peeled and scooped out of skin
  • 1-2 lime, juiced *
  • 1 plum tomato, seeded, diced
  • 1/4 cup of red onions, diced
  • 1/4 cup extra virgin olive oil, plus more to drizzle
  • 1 jalapeño, diced – optional – plus more for garnish
  • sea-salt to taste – don’t be afraid, it will need it *
  • freshly ground black pepper, to taste
  • 1 large bag of tortilla chipsPreparation:

1) In a large mixing bowl, add the avocados, lime juice, tomatoes, onions, oil, jalapeño, salt and pepper. Use an old-fashioned potato masher, and mash it about 20 – 25 times by hand. I use this method because I like my guacamole chunky, and this way, it stays nicely on the tortilla chip. Who wants a runny guac??

2) Place in a serving bowl and chill for at least 30 minutes to one hour. When ready to serve,  taste for flavors, add more salt, and lime if necessary.  Give it a good stir. Drizzle with olive oil. Garnish with jalapeño. Serve with the tortilla chips.

Your guests will be dancing salsa while watching the game.

Cook’s Tips:

1) Use the small avocados because they taste better. Always have extra ones because you never know if one will be rotten on the inside.

2) Always check for acidity, the amount of lime you will use, will depend on how juicy they are.

3) Unless, you are on a sodium-restricted diet, you will need to use salt to bring the flavors together.

4) As you can see, I avoid using strong spices because I want to taste the avocados…

Happy Super Bowl Sunday! Enjoy!!!!

Gina Martino Zarcadoolas
My Food, Wine & Travel Lifestyles

Guacamole

Guacamole by Foodiewinelover

Keftedes, Greek Meatballs

Keftedes

Making Keftedes, Greek Meatballs

Keftedes, Greek Meatballs

Keftedes

Keftedes

Keftedes, Greek Meatballs

I married a Big Fat Greek Family, and we all love to eat Greek food.  Hubby’s Aunt Jennie is an excellent cook, and used to own a restaurant. She also loves to entertain family and friends. I learned a few things from her, about Greek Cuisine.  She makes the best Keftedes, leg of lamb, Pastichio, Moussaka, Spanakopita, and a very scrumptious Baklava. She always tells me her meatballs include 10 ingredients, but I never write them down. So I am going by memory here. I can easily call her, but this dish came out so delicious. As the saying goes, if it ain’t broken don’t fix it. I use a little breadcrumbs in this recipe, but I noticed some recipes call for some white bread.

Serves: 6-8  Level of difficulty: Medium
Yield: 24 meatballs more or less depending on how big you make them. You can use an ice cream scooper to make them evenly.

Ingredients:  

  • 2.5 ground sirloin
  • 1 medium onion, diced
  • 6 garlic cloves, minced
  • 1/2 ounce of fresh mint leaves, chopped
  • 1 large handful of flat-leave parsley, chopped
  • 1 tsp. dried oregano, or 2-3 sprigs of fresh ones, chopped
  • 1/2 cup seasoned breadcrumbs
  • 2 eggs
  • Salt & Pepper to taste
  • Olive oil for fryingPreparation:

    1) Prep the first 10 ingredients, and place in a large bowl. Mix well and form the meatballs.  I always taste test one first, by pan frying it, this way, I can add more seasoning, if necessary.

2) You will work in batches. In a large skillet, cover the bottom
with olive oil and heat it over medium-high heat.  Always make
sure, oil is hot before pan frying, otherwise, you will end up with
soggy meatballs.  Place meatballs in a single layer, and pan fry for about 6-7 minutes on one side, then flip them and fry an additional 6-7  minutes on the other side.  You may have to lower the flame to medium-heat at that point, otherwise, if it’s too high, they will get very dark. Do not overcook them as they will dry up. This may take some practice. You can also bake them for a healthier version.

3) Remove, and arrange them on a plate. Garnish with some mint leaves.   Serve it with some Tzatziki Sauce on the side. The meatballs  can be served as a Meze, an appetizer, or serve it with a Greek Salad for a full meal.

I can assure you, you and your family will enjoy this Greek deliciousness.

Get cooking, and let me know how they come out!

Kali Orexi

Disclosure: I do not get paid to mention the Fage brand, I happen to like their Greek Yogurt. Please make sure meat is fully cooked to avoid the risk of food-born illnesses.

Gambas al Ajillo, Spanish-Style Garlic Shrimp

Spanish-Style Garlic Shrimp

Gambas al  Ajillo, Spanish-Style Shrimp are very common in Spain. They are packed with flavors and easy to prepare.  If you love to entertain, your guests will love these delicious tapas. (appetizers)

Serves: 4
Level of difficulty: Super easy

There are many recipe variations on the internet, but this is my method and style of cooking.

Ingredients:

  •  1 lb. extra-large shrimp, peeled and deveined (yield 16-20)
  •  3/4 cup olive oil
  •  1 head of garlic, chopped
  •  2 -3 dried chiles
  •  Flat-leave parsley for garnish, optional
  • Sea salt, optional

    Preparation: 

1) In a large skillet, heat olive oil over medium to medium-high heat. Add the chiles, let them release their flavor in the oil for about  for 1-2 minutes. (Keep them in the pan)

2) Add the shrimp in a single layer. Sautee for about 3 minutes, then add garlic.

3) Flip the shrimp, cook an additional 2-3 minutes, until the shrimp are no longer translucent.

Voila, it’s that simple! I usually garnish with parsley but I was entertaining at the last-minute, and didn’t have the time to do it.

Spanish Style Garlic Shrimp

Wine pairing suggestions:  Albariño, a wonderful spanish white wine. It is also produced in Portugal.

Tip)  If you are cooking for a crowd, I suggest that you make them in batches.

Buen Provecho!
Bon Appetit and Cheers from My Kitchen!

Gina

Shrimp Saganaki

FoodieWineLoverDecember2014 029


Shrimp Saganaki

I love everything Greek! After all, I’m married to one, and to his Big Fat Greek family.  One of the things they enjoy doing, is eating, and they love celebrating everything with food. I do have some knowledge on the Greek culture, because I had the opportunity to visit some beautiful places in Greece. I’ve also made some wonderful Greek friends on Facebook. One of the biggest staples in Greek cooking is Feta cheese, and I love it on almost everything. There’s nothing more Greek than that in my opinion. I love it in salads, omelettes, recipes, with Pita bread, or by itself. Today, I will share with you a lovely recipe made with shrimp and feta cheese, and it’s a winner in my book. The name Saganaki is given to dishes that are cooked in this frying pan, with two handles. Traditionally, this pan is used in making shrimp dishes, and to flambe’ some delicious Greek cheeses. You don’t need this specific pan to make this recipe, but I wanted to share some of the Greek traditions with you. Some traditional recipes call for tomato paste which I love using, and they also leave the shell on the shrimp. It does make for a killer presentation.

Serves: 6-8 Level of difficulty: Easy

 Ingredients: 

  •  1.5 – 2 lb. large shrimp, peeled and deveined, tails on
  •  3 tbsp. olive oil + more
  • 6-8 garlic cloves, chopped
  • 1 pint roasted cherry tomatoes
  • 2 tsp. oregano
  • 1/2 – 3/4 ounce ouzo, Greek liqueur
  • Salt and black pepper to taste *
  • 4-6 oz. Feta cheese, crumbled *
  • Flat leave parsley, chopped for garnish

Preparation:

1) Place tomatoes on a tray, drizzle with olive oil and salt. Bake in a 375 degree oven for 20-30 minutes, or until caramelized.

2) In the meanwhile, In a “Saganaki” or a large frying pan, over medium-high heat, heat olive oil, sautee the garlic, 1 minute, add the shrimp. Cook for about 3 minutes. Deglaze with ouzo, turn the shrimp, add the tomatoes, oregano, black pepper, cook for 2 minutes. Lower the flame to medium-heat,  add the Feta cheese, and cook an additional 1-2 minutes, or until the shrimp are no longer translucent. Garnish with parsley. Drizzle with olive oil. Serve with orzo, potatoes or pasta. I served mine with whole-wheat angel hair. This dish makes a wonderful meze, which is Greek for snack or appetizers.

*Be careful with the salt, as the feta is already salty. I like to buy the feta in a container, and crumble it myself. It has a fresher taste than the already crumbled one.

If you don’t have ouzo readily available, use some dry white wine, it will be the next best thing. However, ouzo is the way to go in this dish, in my opinion.

I hope you have enjoyed this blogpost, and will attempt to make it soon for your loved ones. It will be the talk of the town, I promise you.

Happy Cooking from My Kitchen to Yours!

Gina/Foodiewinelover
My Food, Wine & Travel Lifestyles


Finger Licking Chicken Wings

Chicken Wings

Chicken Wings

Most of the time we go out to eat chicken wings, and usually order it Buffalo style.  This time, I have created an Asian/Caribbean fusion version of this recipe that you will find absolutely delicious.

Serves: 6 – 8 as an appetizer – 4 as an entrée with a side dish.
Level of difficulty: Easy – medium

Ingredients:  

  • 4 lb. whole chicken wings
  • 3 tbsp. soy sauce, low sodium
  • 2 tbsp. olive oil
  • 6 garlic cloves
  • 2 handful of cilantro
  • 1 tbsp. red wine vinegar
  • 1 tsp. freshly grated ginger
  • 4 tbsp. honey
  • 2 scallions, chopped for garnish
  • Salt and ground pepper to taste
  • Pinch of red pepper flakes, optional


Preparation: 

1) In a blender, or food processor, combine soy sauce, olive oil, garlic, cilantro, vinegar, ginger. Blend together, but make sure there are bits and pieces of garlic to give it some texture. Set aside.

2) Place the chicken wings in a single layer on a large tray, season lightly with salt and black pepper to taste, (Soy sauce tend to be salty, please take it easy on the sodium) on both sides. Pour the mixture on the wings, drizzle the honey. Mix well with your hands, and make sure the wings are nicely coated with mixture. Cover with foil.

3) In a 350 degree oven, place the wings on bottom rack, bake for 30 minutes. Remove the tray from the oven.

4) Remove foil. Broil on the middle rack for 10 minutes. Turn them, broil other side for an additional 1o minutes.  The entire cooking process takes about 50 minutes.  (30 minutes baking, 20 minutes broiling) The wings should have a nice golden brown color, with a caramelized sauce. Please make sure, the chicken is cooked through before attempting to taste it.

Place the wings on a serving platter, with the sauce on the side. Garnish with scallions. Serve with a side dish of your choice, or as an appetizer. My family devoured all the wings in a blank of an eye. They thought it was a home run!

Happy Cooking! Keep Smiling at your food and your food will smile back at you.


Gina’s Hummus

Good morning all! I am still very excited about blogging and hope more of you will join me on my new journey.   I have debated what to post, since I have a nice collection of recipes in my database. Today, I decided to share with you my popular Hummus recipe. It’s always a big hit at my gatherings and so easy to prepare.

Serves:  6-8
Degree of difficulty: Easy

INGREDIENTS:

  • 1 – 16 ounces can garbanzo beans drained and rinsed
  • 1/4 cup water
  • 2 garlic cloves
  • 1/4 tsp. salt, optional
  • black pepper to taste
  • 1 tbsp. Tahini (sesame paste) optional but highly recommended for richness
  • 2 tbsp. extra virgin olive oil plus more for drizzling
  • 1 lemon
  • Paprika
  • Olives and flat leaf parsley for garnish, optional

Very appealing to the eyes

Very appealing to the eyes


PREPARATION:

Combined all the ingredients (except for the  paprika and garnishes)  in a food processor or blender until it reaches a creamy texture. Add more water if needed. Place in a medium size bowl, garnish with olives, parsley, sprinkle the paprika and drizzle some olive oil on top. Chill in the refrigerator for at least an hour. Voila, you got yourself a crowd pleaser! Serve with Pita bread.

Bon Appetit

From Gina’s Kitchen