Entree

Shrimp Lo Mein

Mise en place for Shrimp Lo Mein
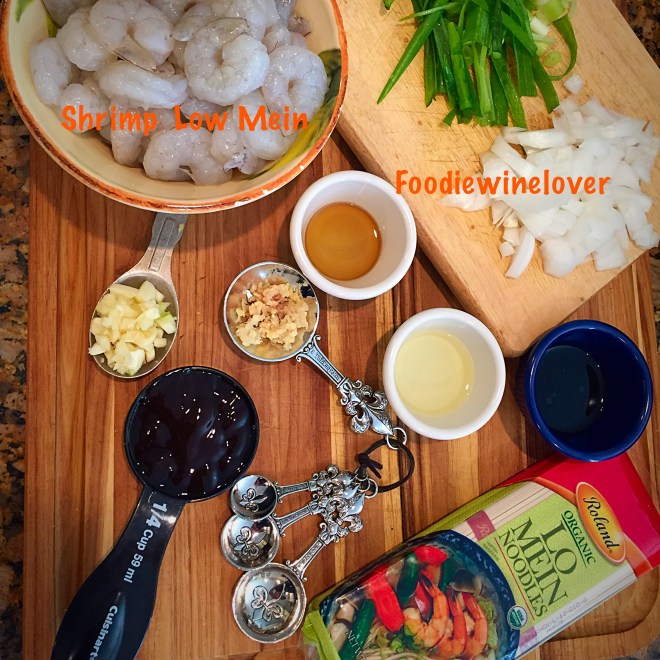
This post is dedicated to a wonderful social media friend, Adrienne. She creates delicious recipes, and takes beautiful photographs of food. All her dishes are vibrant and enticing, but her Shrimp Lo Mein caught my attention on Instagram.  I immediately asked her for the recipe, and she graciously provided it to me. It didn’t take me long to try it in my kitchen, and my family  loved it. I’m excited to share this delectable Chinese dish with all of you.

Serves: 4-6 Level of difficulty: Easy

Ingredients:

  • 1 package, Lo Mein Noodles, 13.5 oz.
  • 1.5 lb. of shrimp, peeled, deveined, tail-off
  • 2 tbsp. of vegetable oil, + more to drizzle on noodles
  • 1 tsp. of sesame oil
  • 3 garlic cloves, chopped
  • 1/2 tbsp. ginger, grated
  • 2 tbsp. water + more, if necessary
  • 2 tbsp. low-sodium Soy sauce, + more to drizzle
  • 1/4 cup Oyster Sauce
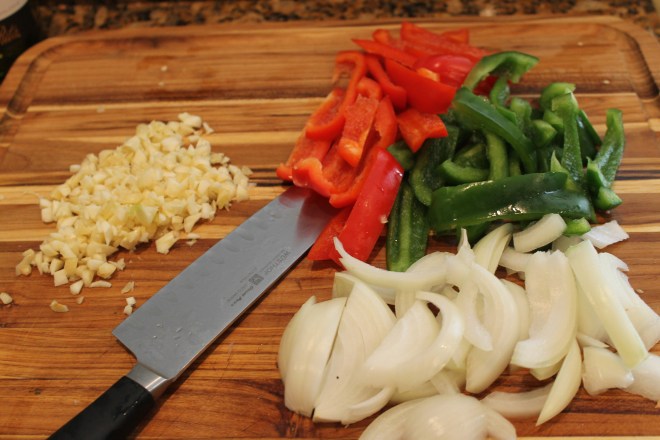
  •  1 small onion, chopped
  • Chinese chives, or 3 scallions * 

    Preparation:

    1) Cook the noodles according to package directions. (This one took exactly 3 minutes.) Drain and set aside. Drizzle noodles with vegetable oil to avoid them from sticking together.

    2) In a wok, or frying pan, over medium-high heat, heat vegetable oil and sesame oil. Add garlic, ginger, onions, shrimp, scallions,  Soy sauce and Oyster sauce, water.  Cook until the shrimp turns pink.

    3) Add Lo Mein noodles to the shrimp and mix well.  Drizzle with more Soy sauce, to taste.  Garnish with fresh scallions.

    The recipe calls for Chinese chives, but since they were not readily available, I used scallions. Celery can also be used as a substitute.

    This recipe hits all the high notes, and will become a part of my repertoire. Thank you Adrienne for inspiring me with your culinary creations.

    Warning: Do not use any salt, as some of the ingredients are already salty. If you are on a sodium-restricted diet, this dish may not be suitable for you.

Happy Cooking from My Kitchen to Yours,

Gina


Leg of Lamb, Greek-Style

Leg of Lamb

Leg of Lamb, Greek-Style

Leg of Lamb, Greek Style
Today we are celebrating a special birthday, and I am dedicating this blogpost to my lovely fellow-foodie-blogger friend, Athina, from  Kicking Back The Pebbles.  She is one of the 6 admins at Foodify, (including myself) a fabulous Facebook group of food bloggers  from around the world.  She is such a valuable  asset to the group, and has a generous heart.  She lives in Greece, and I am doing it the Greek way with all the fanfare.  In Greece, depending where you live, lamb is usually the meat served at Easter. I  made this leg of lamb, (1/2 to be exact) a while back in April, for Greek Easter. I normally cook a whole leg of lamb, but this time, I was cooking just for the four of us. I asked the butcher to cut the lamb in half, and he did. Today, I will share my version of a Leg of lamb. I have made this dish on many occasions, and it’s always a big hit.

Serves: 4-6 Level of difficulty: Easy-medium
Prepping time: about 10 minutes, cooking time: 1.15 minutes

Ingredients:

  • 1/2 leg of lamb, 3.5 lbs.
  • 1 medium onion, chopped
  • 6 garlic cloves, whole
  • Olive oil, a generous amount
  • Oregano, to taste (lots)
  • 2 cups of water, or low-sodium chicken stock
  • 1 cup of dry white wine
  • 1/2 cup chopped tomatoes, canned or fresh *
  • 1.5 cup orzo (a shape of pasta)
  • Salt & pepper to taste

    Preparation:

    1) Season lamb with salt & pepper, pierce some holes, and place the garlic cloves in the meat.  Place the lamb in a large deep metal tray.  Sprinkle oregano, and put the onions on top of the lamb. Drizzle generously with olive oil.

    2) In a 350 degree F. preheated oven, bake the lamb for about 35-45 minutes. Remove the tray with the lamb from the oven.  LEAVE THE OVEN ON!  Sprinkle the orzo all around the lamb.  Add the tomatoes, water, more olive oil, salt & pepper to the liquid. Give it a good stir. Place the tray back in the oven to continue cooking until the orzo is done. Always, keep an eye on your food. Add more liquid if necessary. It should come out, nice and moist.

    Leg of Lamb

    Leg of Lamb (in my kitchen)

    This is a picture of a whole leg of lamb, in my kitchen from the past.  If you are cooking for a crowd, use the same method, adjust the measurements, and allow for more cooking time.

    Leg of Lamb and lemon potatoes also make a beautiful combination, and is more traditional.

    Wine suggestions:

    Agiorghitiko from Nemea,  in the region of Peloponnese, a fruity red wine.

    Xinomavro, from Naousa, in the region of  Macedonia, a rich red wine with more tannins.

    Let’s not forget, Ouzo goes with everything! Opa!  (DO NOT CONFUSE ORZO WITH OUZO)

    Wait!!! That’s not all, no party would be complete without some Greek deliciousness. I am serving  Kouzounas Kitchen scrumptious, Loukoumades. They are mouth-watering Greek doughnuts. Like her saying goes: “let your taste buds say Opa!”

    Loukoumades, Kouzounas Kitchen

    Loukoumades, Kouzounas Kitchen

    χρόνια πολλά,  Happy Birthday Athina! Hope you are enjoying your celebration in style.

Polla Filakia! (Lots of kisses) darn, WordPress, wanted to change         Filakia to Tilapia, LOL!

Love, Gina


Shrimp in Garlic Sauce with Bell Peppers

Shrimp in Garlic Sauce with Bell Peppers

Shrimp in Garlic Sauce with Bell Peppers

Prepping for Shrimp in Garlic Sauce with Bell Peppers

Prepping for Shrimp in Garlic Sauce with Bell Peppers

Shrimp in Garlic Sauce with Bell Peppers

Shrimp in Garlic Sauce with Bell Peppers


We occasionally eat at a classic, go-to Cuban restaurant called Las Vegas Cuban Cuisine . They make a delicious Shrimp in Garlic Sauce with Bell Peppers.  I love it so much that I decided to recreate it, and the result is amazing. I am excited to share my version with all of you.

Serves: 4-6 Degree of difficulty: Easy
Prepping time: 15 minutes
Cooking time: 13-15 minutes

Ingredients:

  • 1/2 cup olive oil + more to drizzle
  • 1 medium onion, sliced
  • 3 bell peppers, green, red and yellow, cut in julienne
  • 3/4 cup garlic, chopped
  • Sprinkles of smoked paprika
  • Salt to taste
  • pepper flakes, optional
  • 1.1/2 cup dry white wine
  • 1.1/2 lb. extra-large shrimp, peeled and deveined

Preparation:

1) In an extra-large pan, over medium-high heat, heat up olive oil, sauté onions and peppers for about 7-9 minutes. Add garlic, paprika,  salt, pepper flakes. Cook and stir for 1-2 minutes. Deglaze with wine. Let it reduce, 1 minute.

2)  Add shrimp,  let is simmer for 3-5 minutes, or until  shrimp is no longer translucent. Do not overcook them, as they will get chewy.

Shrimp in Garlic Sauce, using yellow peppers


I usually serve the shrimp over white rice like they do it at the restaurant. You certainly can use brown rice, or another grain of your choice. Drizzle with olive oil.

Wine pairing suggestions: Either use the same wine you used to cook, (make sure it’s drinkable) or a nice chilled white Rioja.

Buen Provecho!  (Bon Appetit!)

Happy Cooking from My Kitchen to Yours,

Gina Martino Zarcadoolas, aka Foodiewinelover
Culinary Personality, Food & Wine Blogger
Author of the cookbook: Cuisines, Corkscrews & Cultures
Level-2 Certified world-renowned – “WSET: Wine, Spirit, Education, Trust”
Level-2 Certified Sommelier
Winner of 2019 “Salice Salentino USA Bloggers” Award
Exclusive photos by Gina Martino Zarcadoolas
All rights reserved.


Linguine alle Vongole, Clams in a Wine Broth

Mise en place for Linguine with Clams in a Wine Broth

Mise en place for Linguine with Clams in a Wine Broth

Linguine with Clams in a Wine Broth

Linguine with Clams in a Wine Broth

Clams in a wine broth

It’s been a while since I have made pasta with clams. I have a few versions of them, but I like to change things up from time to time. It was 5:20 PM when I headed to the kitchen, and I challenged myself to have dinner ready on or before 6:00 PM. I felt like I was on a cooking show, but with less pressure of course. I began prepping all the ingredients, and needed everyone out of my way.  I blasted the air, and started cooking like a mad woman. You certainly don’t have to put that kind of pressure on yourselves. To add to the madness, I was shooting pictures, and decided to do a last-minute mini video.  Here is a list of the ingredients you will need, and my method of cooking.

Serves: 4   Level of difficulty Easy-Medium
Time: From start to finish 5:20 PM – 5:59 PM

Ingredients:

  • 2 dozen little neck clams, scrubbed well. *
  • 1/2 head of garlic, chopped
  • 2-3 dried Thai chiles, optional *
  • 2 shallots, chopped
  • 1 tsp. tomato paste
  • 1 cup dry white wine, Chardonnay
  • 3 tbsp. extra-virgin olive oil, plus more to drizzle
  • 4 tbsp. butter, optional, for added richness
  •  Flat-leave parsley for garnish
  •  1 lb. of Linguine
  • Water for boiling pasta, + reserve 1/2 cup for later
  • Salt for the pasta water

    Preparation:
    1) Prep all your ingredients.  Set aside. Bring pasta water to a boil.2) In the meanwhile, in a medium-sized pan (with a lid) heat up olive oil,  add the chiles, sauté for 1-2 minutes, and REMOVE.  Add the shallots, sauté for 2-3 minutes, add the garlic and tomato paste. Stir until it caramelizes.  Deglaze with the wine. Lower the heat, and reduce for 1-2 minutes.

3) Add the clams,  cover with a lid and simmer on low- heat for about 10 minutes or so, or until the clams open up.

4) You will be doing some juggling. By now, the water probably started to boil, add the salt, drop pasta in the water. Cook according to package directions. (I like it al dente, to the bite).

5) Clams should be done. (If you overcook them, they will get chewy. Either keep them on very low flame,  or remove them from the burner.

6) In the midst of cooking, you will find time to prep the garlic bread and broil it. Keep your eyes, on the stove and burners at all times.

7) Drain the pasta, and add it to the clams. ( Make sure you reserve 1/2 cup of pasta water) Use your judgment about how much broth you want.  Stir in the butter, and the reserved pasta water. Mix well. Put back on low flame if necessary to warm it up.

8) Serve at once, in a pasta bowl. Drizzle with olive oil. Garnish with flat-leave parsley. Voila! Done!  My dinner was served at 5:59 PM. I rose to the challenge.

Linguine alle Vongole

I served it with some homemade crostini, (garlic bread), and my family had a feast. I hope you will try this hearty and delicious dish in your kitchen for your loved ones.

Gina’s Tips:

  1. Make sure clams are all closed when you buy them. Those that stay open are dead, and not suitable for consumption.   Beware of certain allergies with shellfish.
  2. Warning: The chiles are optional, because they are very spicy. However,  if you want to add some kick to the dish, use them as per my instructions.

Wine suggestion: A nice chilled Chardonnay, or any white wine of your choice.

Bon Appetit from My Kitchen to Yours!


Chicken & Eggplant Parmigiana

Eggplant

Chicken cutlets

Chicken Cutlets

San Marzano Tomatoes San Marzano Tomato Sauce

Eggplant & Chicken Parmigiana

Chicken & Eggplant Parmigiana
I know what you’re thinking!  Is she out of her mind to do all that work. Ok, I got some “splainin” to do. When I don’t cook during the weeknight, I feel like I let my family down, because they enjoy my cooking for the most part. I had class one day, and by the time I got home, I looked at the chicken cutlets, and said to myself, what am I going to do with them? I decided, I wasn’t going to cook, and order in. That’s what we did. The next day, I still had to come up with an idea for the chicken. I wanted to dress it up, and make up for not cooking the night before. I found an eggplant in my veggie bin, had plenty of eggs, olive oil, and seasoned breadcrumbs. The lightbulb went on in my head, how about making a Chicken & Eggplant Parmigiana combo. It was crazy but I had my mind-set on it. I normally make eggplant parm or chicken parm separately, but this time, I decided to combine them. This dish was a big hit, and when I saw the smile on my family’s face, I knew I had redeemed myself. I must admit, I was happy with the result. Of course, my kitchen was a mess, but it was worth all the work. I suggest you make this on the weekend when you have some time to spare, and I promise you, your family will adore you for it.

This is a recipe that I created in My Kitchen, and I’m excited to share it with all of you.

Serves: 4-6
Level of difficulty: Medium-difficult
Total time from start to finish: 1 hour and 20 minutes

Ingredients: (1st set)

  • 1.25 – 1.5 lb. chicken cutlets (thinly sliced)
  • 1 eggplant, sliced
  • 3 eggs, beaten
  • Lots of seasoned breadcrumbs
  • Lots of extra virgin olive oil, or regular olive oil
  • 1/2 lb. fresh Mozzarella, sliced
  • Pecorino Romano or Parmigiano Reggiano cheese, grated
  • Salt and pepper to taste

Preparation:

1) Season eggplant with salt and pepper, let it sit for at least 10-minutes. Dip the eggplant in eggs, then hold it for a second to remove any excess, drench in seasoned breadcrumbs. (always shake of excess) . Do it one at a time, (eggs, +breadcrumbs) Place them on a dish.  Time to pan-fry them.

2) On medium-high heat, cover the bottom of a large pan with olive oil, pan fry the eggplants in a single layer, 3 minutes on one side, and 3 minutes on the other side. Remove, and repeat the same method over.  It’s ok, if oil is a little dirty, add more oil, if necessary. Set the eggplant aside. If you feel like the burner is too hot, just lower the heat a little.

Ingredients for the sauce:

  • 1 large can of whole tomatoes, (San Marzano)
  • 4 garlic cloves, chopped
  • 1 large basil leaf, torn
  • Salt & Pepper to taste
  • 1/4 cup or so of extra virgin olive oil

    Preparation:

    1) In a medium-sized saucepan, on medium-high heat, heat up the oil, sauté the garlic for a minute or so. Add the tomatoes, and crush them using a potato masher.  You can also use your hands to crush them before putting them in the pot. Drop the basil, season with salt and pepper, and simmer for about 15 minutes. While the sauce is simmering on low, you will be preparing the chicken.

    2) Season chicken with salt and pepper, dip in eggs, and seasoned breadcrumbs, set aside. In the meanwhile, clean up the pan you fried the eggplant in, (just drain old oil, and wipe clean with a paper towel. Start with some fresh olive oil. You will be using the same method as the eggplant. Pan fry for 2 minutes on one side, and 1 minute on other side. Do not taste the chicken at this point, as it may not be fully cooked. It will finish cooking in the oven. Work in batches, then repeat the same process over.

    3) By this time, the eggplant, the sauce and the chicken are ready to be assembled in a large casserole baking dish.  Spread some sauce on the bottom of dish,  arrange the chicken, (as much as you can fit) add some sauce, grated cheese, Mozzarella, layer with eggplant, and repeat. You may end up with an extra piece or two of chicken, just fit  them somewhere, it doesn’t have to be perfect. You are not building a house, LOL!  Finish with Mozzarella on top.

    4) Bake in a 375 degree F. oven for 15 minutes and broil for 5 minutes.

    Tip: Always make sure oil is hot before frying, otherwise, the eggplant will come out soggy and drenched in oil.

    I hope you will try this delicious dish. If you are on a budget, you do not have to use expensive brands. Any canned tomatoes will do the job, and some regular parmesan cheese. If fresh mozzarella is too expensive, just use the packaged ones.

    Pairing suggestions: A lovely Chianti, Rosso di Montalcino, Vino Nobile, or a Montepulciano d’Abruzzo. You can find the last one reasonably priced.  They are all Italian wines, as I like to pair the cuisine and the wines from the same country together. Sometimes, it can even be broken down by region, especially in Italian cooking,  where many dishes are very regional.  Ideally, you would pair the dish with a wine from the same region.

    Buon Appetito!

    Gina, from Foodiewinelover

Keftedes, Greek Meatballs

Keftedes

Making Keftedes, Greek Meatballs

Keftedes, Greek Meatballs

Keftedes

Keftedes

Keftedes, Greek Meatballs

I married a Big Fat Greek Family, and we all love to eat Greek food.  Hubby’s Aunt Jennie is an excellent cook, and used to own a restaurant. She also loves to entertain family and friends. I learned a few things from her, about Greek Cuisine.  She makes the best Keftedes, leg of lamb, Pastichio, Moussaka, Spanakopita, and a very scrumptious Baklava. She always tells me her meatballs include 10 ingredients, but I never write them down. So I am going by memory here. I can easily call her, but this dish came out so delicious. As the saying goes, if it ain’t broken don’t fix it. I use a little breadcrumbs in this recipe, but I noticed some recipes call for some white bread.

Serves: 6-8  Level of difficulty: Medium
Yield: 24 meatballs more or less depending on how big you make them. You can use an ice cream scooper to make them evenly.

Ingredients:  

  • 2.5 ground sirloin
  • 1 medium onion, diced
  • 6 garlic cloves, minced
  • 1/2 ounce of fresh mint leaves, chopped
  • 1 large handful of flat-leave parsley, chopped
  • 1 tsp. dried oregano, or 2-3 sprigs of fresh ones, chopped
  • 1/2 cup seasoned breadcrumbs
  • 2 eggs
  • Salt & Pepper to taste
  • Olive oil for fryingPreparation:

    1) Prep the first 10 ingredients, and place in a large bowl. Mix well and form the meatballs.  I always taste test one first, by pan frying it, this way, I can add more seasoning, if necessary.

2) You will work in batches. In a large skillet, cover the bottom
with olive oil and heat it over medium-high heat.  Always make
sure, oil is hot before pan frying, otherwise, you will end up with
soggy meatballs.  Place meatballs in a single layer, and pan fry for about 6-7 minutes on one side, then flip them and fry an additional 6-7  minutes on the other side.  You may have to lower the flame to medium-heat at that point, otherwise, if it’s too high, they will get very dark. Do not overcook them as they will dry up. This may take some practice. You can also bake them for a healthier version.

3) Remove, and arrange them on a plate. Garnish with some mint leaves.   Serve it with some Tzatziki Sauce on the side. The meatballs  can be served as a Meze, an appetizer, or serve it with a Greek Salad for a full meal.

I can assure you, you and your family will enjoy this Greek deliciousness.

Get cooking, and let me know how they come out!

Kali Orexi

Disclosure: I do not get paid to mention the Fage brand, I happen to like their Greek Yogurt. Please make sure meat is fully cooked to avoid the risk of food-born illnesses.

Delectable Veal Ossobuco

Veal Ossobuco

Mise en place for Veal Ossobuco

Tomato paste

Veal Ossobuco

Veal Ossobuco

Prepping for Veal Ossobuco

Ossobuco is the Italian name for bone with a hole that has the marrow inside it. Veal Ossobuco is a hearty and delicious rustic veal-shank stew. This meal originated in Milan, and it’s usually served with a side of Risotto alla Milanese, (with saffron).  The veal shank is usually cut up in 1 – 1.5 inch thick, and is braised in a tomato-based and wine sauce. It’s the kind of meat that needs to be slow-cooked in order for it to become tender. I came up with this scrumptious recipe, and I am happy to share it with all of you.

Serves: 4   Degree of difficulty: Medium
Total preparation and cooking time:  About 2 hours.

Ingredients:

  • 3.5 lb. veal shank, cut up in 1 – 1.5 inch thick *
  • 3 tbsp. extra virgin olive oil, + more as needed
  • 1/2 cup dry white wine (chardonnay)
  • 2 cups of low-sodium chicken broth
  • 1/2 cup chopped tomatoes, fresh or canned
  • 1 tbsp. tomato paste
  • 3 carrots, sliced
  • 1/2 fennel bulb, sliced (can substitute with celery)
  • 5 garlic cloves, chopped
  • 1 medium onion, chopped
  • Salt and freshly ground pepper to taste
  • 1/2 tsp. thyme
  • 1/2 cup of flour
    Preparation:1) Preheat oven to 350 degrees F.2) In the meanwhile, season veal with salt and pepper. Drench in flour and shake off the excess. Discard any leftover flour.

    3) In a Dutch-Oven pot, on medium-high heat, heat up, 2-3 tbsp. olive oil, sear the veal for about 3 minutes on each side until it gets a nice brown color. You may have to work in batches depending how many veal shanks you have.

    4) Remove and set aside. In the same pot, add more oil, if necessary, and sautee the onions, carrots, fennel for 1-2 minutes, add garlic, 1 minute, then, tomato paste, and stir well until it caremelizes. Deglaze with the wine. Scrape the bottom of the pot and reduce for 1-2 minutes. Add the broth, tomatoes,  thyme, salt & pepper. Return the veal shanks in the pot. Bring to a boil, and turn the burner off.

    5) Place the pot covered in the middle rack of the oven, and let it braise for about 1.5 – 2 hours. Check occasionally for seasoning.

    6) While the veal is braising you can prepare the Risotto or a side dish of your choice.

*The meat is sometimes wrapped in a butcher twine to prevent it from falling apart, and maintain its beautiful shape. My butcher assured me that I didn’t need it this time, because of the thickness and the quality of the meat. He was right on.

Suggestions:  Typically, Gremolata is used as a garnish in this dish. It is a condiment made of either lemon or orange zest, chopped parsley and garlic.

Gremolata

Gremolata

My family and I savored this yummy meal, but the best part of this dish is the marrow inside the bone.  We were all fighting for the meat with the most marrow. It is succulent and is considered a delicacy.

I hope you will give this delectable recipe a try in your kitchen.

Wine suggestions: Chianti, Super Tuscan, Rosso di Montalcino, Aglianico, Montepulciano d’Abruzzo. They’re all  Italian wines and most of them are affordable.

Happy Cooking from My Kitchen to Yours!

Veal Ossobuco The best part…….

Veal OssobucoPlease note, I have made Ossobuco again since this blogpost, and updated the featured picture on 4/7/2016

My great friend Angela introduced me to another wonderful version of Ossobuco in a brown sauce. It’s her dad’s famous recipe, and it is equally as delicious.

New York Strip Steaks Grilled To Perfection

IMG_3189

IMG_3195

Grilled New York Strip Steaks

Grilled New York Strip Steaks, cooked medium-rare

It’s summertime,  that means, it’s the season for bathing suits, flip-flops, and splashing in the water to keep cool. It’s also time to enjoy the outdoors, with some burgers, an occasional hot dog, and some delicious steaks on the grill. Once in a while, I like to savor a nice juicy steak. It’s hard for me to pick one cut, since I like all of them. However, today, I will share with you, an easy way to grill some New York strips. When picking your steaks, make sure they have thin white streaks of fat throughout them, called marbling. They keep the meat nice and juicy. In addition, to that, the fat adds lots flavor.

Serves 3-6  depending on your appetite and diet restrictions.
Level of difficulty: Easy

Ingredients:  

  • 3 New York strip steaks, about 12 – 14 oz. each
  • Freshly ground pepper
  • Himalayan salt or sea salt *

Preparation: 

1) Always take out the meat from the fridge at least 30 – 45 minutes to bring it to room temperature. This step is vital in making sure the meat is cooked evenly.

2) In the meanwhile, season liberally with salt and pepper.  Let it marinate on a tray or dish, until it reaches room temperature.

3) Fire up the grill at high temperature.  MAKE SURE IT’S SUPER HOT!

4) Place the steaks on the grill, cover, and forget about them for about 3 – 4  minutes. I recommend you use a timer until you master this method.

5) They should have nice grill marks on the cooked side, flip them, cover and cook the other sides, another 3 -4 minutes. This will take some practice, and you may need to lower the flame if necessary.  With this method, you will obtain a medium-rare temperature. If you want a medium temperature, lower the flame, and cook an additional 2-3 minutes on each side.

Removed the steaks from the grill and place them on a platter. Let them rest for a couple of minutes to retain the juices. DO NOT COVER! You will have the perfectly grilled New York Strip Steaks.

I served them with my delectable pasta salad, and my family had a feast. Grilled veggies and field green salads also make a nice accompaniment.

I recommend a full-bodied red wine to go with the steaks to cut through the fat. A Malbec from Argentina,  a California Cab, or a beautiful Italian Barolo. The choice is yours. If you like beer, then by all means, go for it.  I suggest freshly squeezed lemonade for the kids.

Keep hydrated, drink lots of water in between, and don’t forget the sunscreen.

Happy Grilling!

Gina, Foodiewinelover

Disclosure: There’s always a health risk involved when consuming red meat, unless it’s fully cooked. (Luckily for me, I never had an issue). For your safety, I recommend you follow the advice of your doctor or a nutritionist.


My Review on The Ultimate Mediterranean Diet Cookbook, by Amy Riolo

IMG_3487

Citrus-Marinated Scallops

I recently got the Ultimate Mediterranean Diet Cookbook, by Amy Riolo. She is an award-winning writer, well-educated, and a distinguished chef who’s passionate about cooking and preserving the authenticity in traditional recipes. Amy is multilingual, and has lived and worked in many places in the Mediterranean region including Italy, where she immersed herself in the culture and reap the benefits of its healthful lifestyle. She is a culture expert, and very knowledgable in global cuisines and traditions. In addition to her amazing talent, she is beautiful and has a contagious smile.  I have been following her on all her social media outlets, and I always take joy in all her food posts and videos.  When I found out about her book, I couldn’t wait to get a copy. I’ve enjoyed her delectable, easy-to-read recipes, everything is made fresh and on the healthy side. I also love the captivating and vibrant food photography . Every recipe has a cultural tip on the Mediterranean tradition. In the book, Amy explained that she learned that food was not just something to fill our stomachs, but a powerful tool that affected our moods, daily lives, holidays, and wellbeing. She points out that food in that region is also used as medicine, and the Mediterranean diet is not just a diet, it is a lifestyle. It’s a combination of a healthy diet rich in grains, fruits, vegetables, olive oils, fish, lean meats, daily and social activities. Amy also recommends to eat meals together with loved ones whenever possible. She encourages you to maintain a healthy diet on a daily basis,  and to save the “bad food” for special occasions. I made her Citrus-Marinated Scallops and they came out delicious. I served them with a side of roasted butternut squash, and couscous. The recipe I am sharing with you today is an excerpt from The Ultimate Mediterranean Diet Cookbook by Amy Riolo.

This delicious and impressive dish can be cooked in minutes and served as an appetizer or main course. These scallops also taste great when tossed into a salad or pasta, rice, and other grain-based dishes.

Yield: 4 servings

   Ingredients:

  • Juice and zest of 2 lemons
  • 1/4 cup (60 ml) extra-virgin olive oil
  • Unrefined sea salt or salt, to taste
  • Freshly ground black pepper, to taste
  • 1 clove garlic, minced
  • 1.5 pounds (680 g) dry scallops, side muscle removedPreparation:

    In a large shallow bowl or baking dish, combine the lemon juice and zest, olive oil, salt, pepper, and garlic. Mix well to combine. Add the scallops to the marinade; cover and refrigerate 1 hour.  Heat a large skillet over medium-high heat. Drain the scallops and place them in skillet. Cook 4 to 5 minutes per side, until cooked through.Citrus-Marinated Scallops

    Mediterranean Tradition

    All throughout the region, scallops are increasingly being enjoyed raw in beautiful carpaccios. To make a carpaccio, simply place the scallops on a baking sheet lined with wax paper. Cover with plastic wrap and place in the freezer for at least 1 hour. When the scallops are almost hard, remove them from the freezer and with sharp filleting knife, carefully cut the scallops widthwise into paper-thin slices. Place them on a platter. Drizzle with a vinaigrette and serve with greens.

    I hope you enjoyed my book review, and the delicious scallop recipe. If you are a health “nut”, I  highly recommend this cookbook. Amy Riolo is an advocate for healthy cooking with the freshest of ingredients. To obtain the book, just click on the link, The Ultimate Mediterranean Diet Cookbook. 

    “Amy Riolo has created an authentic, yet accessible, guide to eating the Mediterranean diet as it is meant to be eaten. This book captures the Mediterranean essence with delicious recipes form a cuisine that is accessible, flavorful, and nutritionally sound.” Lidia Bastianich, LidiasItaly.com

    The Ultimate Mediterranean Diet Cookbook
    This lovely book will make a nice addition to your collection of cookbooks, or a nice gift for someone who loves to cook.

    Happy Reading and Happy Cooking!

Spaghetti al Pomodoro con Basilico

Spaghetti al Pomodoro con Basilico

San Marzano Tomatoes

San Marzano Tomatoes

Spaghetti al Pomodoro Con BasilicoSpaghetti al Pomodoro con Basilico is Italian for spaghetti in a tomato sauce with basil. It is one of the most traditional, and classic dish you will find in Southern Italy. It originated in Naples, the land of my paternal grandparents. In the Campania region, this dish is known to be a poor man’s dish because of the simple ingredients. It is made with
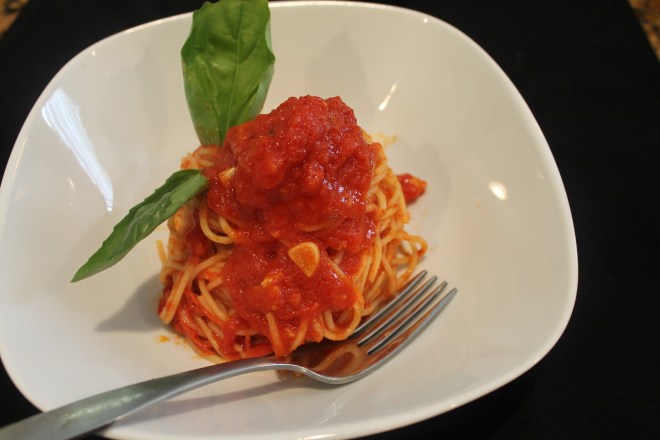
 San Marzano tomatoes that are indigenous to the area, where they are grown on volcanic soil. They are known to be the sweetest tomatoes in the world, very succulent, and less acidic. Here in the US, there is nothing poor about this dish, because it is made with high quality ingredients. There are many variations to this traditional dish, but today, I will share with the you the basic ingredients to make a killer sauce. Italians are very proud of their heritage, and DO NOT LIKE IT, (to put it mildly) when their original recipe is modified, or altered in any way. That is totally understandable, because they are trying to keep hundreds of years of traditions.  Unfortunately, when a traditional Italian recipe is recreated, it tends to lose some of its authenticity, primarily because an ingredient cannot be found, or because it is adapted to meet a person’s lifestyle. Ideally, fresh San Marzano tomatoes would be better, but they cannot be found in my area. Canned peeled San Marzano tomatoes with the D.O.P. label is perfectly acceptable, even by Italian standards. Follow me, Let’s get cooking!

Serves: 4-6 Difficulty: Easy

Ingredients:

  • 1 lb. Spaghetti, Anna brand, or any brand of your choice
  • 1/2 cup good quality extra virgin olive oil, + more to drizzle
  • 6 garlic cloves, sliced
  • 4-6 fresh basil leaves, divided
  • 2  (28- oz) canned-San Marzano, peeled tomatoes, Flora brand
  • Sea salt to taste, for sauce and pasta
  • Parmigiano-Reggiano or Grana Padano

    Preparation:
    1) Do your prepping, slice the garlic, leave one can peeled tomatoes whole, and crush the other one with your hands like the Italians do. It’s so much fun to use your hands, but, I use gloves because I have very long fingernails. (If you want to cheat, put it in the blender for 5 seconds. I didn’t tell you that, shhhhh!) Chop up 2-3 basil leaves. Set aside.2) In the meanwhile, bring water to a boil for the pasta. While that’s happening, you will have plenty of time to make the sauce.3) In a medium-size pot, heat up the olive oil over medium-high heat, sautee the garlic, as soon as it releases its aroma, (if you wait too long, the garlic will burn, and have a bitter taste) drop the peeled tomatoes, the hand-crushed tomatoes, basil, and salt to taste. Bring to a quick boil, lower the heat to medium – medium-low, simmer uncovered  for about 10 minutes. Stir occasionally.

    4) You will be working simultaneously, while your sauce is simmering, the pasta water will come to a boil, add salt to taste, and cook pasta al dente, (to the bite). Follow package directions, minus 2 minutes of cooking time.  To check for doneness, I do it the old fashion way, I taste a strand or two of pasta.

    5) Drain pasta. By this time, the sauce should be done. Pour the pasta in the sauce, turn off the burner, and mix very well until every strand of spaghetti is coated with the sauce. It will look like a lot of sauce, but the pasta will absorb it in no time. Some cooks don’t crush the tomatoes, but that’s a personal preference.

    6) Put the spaghetti in a pasta bowl, add a little sauce on top, drizzle some extra virgin olive oil, and garnish with basil leaves. That’s it!

    Tip #1) please note, black pepper is not used, because the tomatoes are the featured ingredients in this dish.  I didn’t want the pepper to overpower the sweetness of the tomatoes.  This is the case, where less is more in this particular dish.

    Tip #2) Some Italian cooks prefer to serve the grated cheese, Parmigiano Reggiano or Grana Padano on the side.

    Tip #3) Do not throw the pasta on the wall to check for doneness. Use the timer, or simply taste it.

    Tip #4) It is not necessary to put oil in the pasta water. Just stir the pasta at the beginning, to avoid them from sticking to each other. Once they start cooking, they will separate from each other.

    You will pay a premium price for these canned tomatoes, but it will be worth the dining experience. Take it from me, I have been in the kitchen for the last 25 years.

    I have used different brands of San Marzano tomatoes, but I must tell you, it was the first time I tried the Flora brand, and my family and I could not get over the sweetness, and the complex flavors of the tomatoes. I am certain there are many other great brands out there. This is my opinion, and I did not get compensated to write about it.  I’m simply sharing my experience with you in Gina’s Kitchen.

    A little known fact, Neapolitan pizza is made with San Marzano tomatoes,  known to be the best pizza in the world. Now, you can finally understand the reasoning behind it.

    I recommend a delicious Italian red wine to pair with this scrumptious dish. A super Tuscan, a Chianti, a Rosso, the list is endless, and the choice is yours. If you can find Lacryma Christi, it would pair beautifully, since it’s from the same region, and similar volcanic soil as the tomatoes.

    All the images belong to me, Foodiewinelover, except for the last image of the tomatoes. Photo credit is given to Goldlocki, found in Wikipedia.

    Spaghetti al pomodoro con basilico

Everything you see, I owe it to Spaghetti As Sophia Loren puts it, “Every thing you see, I owe it to Spaghetti.”

San Marzano Tomatoes

I hope you will try this delectable sauce, and share your experience with me.

Buon Appetito!

Happy Crushing!